I'm beginning to think it's possible to have just too many scarves!
I thought I had too many hats but now scarves are my problem. I really hope someone has the decency to buy them otherwise I'll be out of money for supplies before I know it.
That last scarf (the crazy pink one) is going for about 15-20 dollars because I know no one is willing to pay more for something they can buy at Old Navy for 7 bucks made by starving children in India working for 5 cents a week.
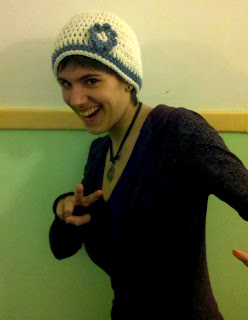
Enough with the blasting. Here's something new!
Yes, this is my sister wearing my latest creation (I finished it today incidentally) And indeed, she looks a little crazy here but normally she looks...well, more normal.
Like this:
Which makes my scarf look more cool, sophisticated elegance.
Well, as much elegance as you can get from purple acrylic yarn and contrasting outfit. And yet, me likey. This one took a little longer than the other scarf (in terms of hours of labor. Not in terms of procrastination time. The infinity scarf took about 5 months while this only took about 2 weeks of hour long crocheting sessions).
Oh yes, I should probably mention that this was crocheted. By me. Obviously. But you already knew that.
I recently joined Ravelry which is kind of like the Facebook for crocheters and knitters and therefore AWESOME. There are THOUSANDS of free patterns and for a cheap geek like me, it's basically heaven. BOOYEAH.
So I got the pattern from this person: "Jennifer Fayard" and it's called "Sandbar".
http://www.ravelry.com/patterns/library/sandbar
There's the pattern and I"m too lazy to copy the instructions, not to mention I adapted it for my own personal needs. For example, instead of casting on 60 I only chained about 42 because it was just too damn wide and it would have A)Taken me FOREVER to make and B)Used a whole extra ball of yarn while I had already used up 2 for the whole thing. And it's already about 6 feet long (which is alot when you're only 5"3. I hate being short) and precisely 8 1/2 inches wide! I measured with a sheet of paper.
I feel sneaky >:D
So yeah, that's about all I'm up to nowadays. I mean, hey, I do have two papers to write but I'd rather finish up these scarves, you know what I mean? I hate fundamentals of business with a burning passion. Anyone want to write my paper on corporate sponsorship and women's sports teams for me? I have to admit that watching sports doesn't really interest me. I do love sports but...not so into the watching OTHER people play them.
Ahem, I really need to go to sleep now because I need to get up at, as my friend would say "the crack of stupid" so I can get to school at 8:15 for 2 HOURS OF BADMINTON!! YAY!!! :D
Night!
Showing posts with label soft. Show all posts
Thursday, November 17, 2011
Wednesday, November 16, 2011
Scarves Abundant
I don't think I've ever worked on this many scarves at once in my entire life.
Scratch that; I've NEVER worked on this many scarves EVER. There's a craft fair at my school in two weeks and I've decided that, along with selling some jewelry and my cheesecake charms, I'm also going to sell some scarves and some hats.
Crocheted/knitted scarves and hats. And so far I have one scarf completed (see below), three more on the way and no hats.
Kill me.
Here's the deal with scarves: they're pretty, they're snuggly, they're warm, they make you go 'aahhhhh' when they're soft and fuzzy.
But they're ANNOYING to make. Not only do most patterns (crochet at least) tell you to chain the number of stitches the scarf is LONG, but if you're knitting them they just never ever ever seem to get longer! It's kind of like your last boyfriend's junk; you want it to get bigger, but it's not getting any longer (courtesy of highschool lady friends. Thank you Andrea.)
Ahem.
Phallic jests aside, the completion of scarves does tend to give the maker a great deal of satisfaction, especially if one has been working on said scarf for a while, then gave up...lost the scarf in the making...and finally found it again only to finish it in two days! YAY!
Take this Circle Scarf for example:
Now, this may look very complex and difficult and you might be saying "Gosh, Gabs, this is really quite something"...
Thank you, thank you *blushes*
Oh, go away false modesty/pride/stupidity. We have no use for you here.
So, despite my ranting that I hate knitting (oh, I haven't ranted about that yet? Ah well, next post will be an anti-knitting rant!), this never ending scarf was indeed knit..knitted? knitteth? I don't know anymore.
So yes, this was created using a Basketweave stitch (as you can see from the photo, it looks kind of like it was woven. I assure you, it was knitted using a combination of purls and knits).
And as you can see from the pictures below, it can be worn in various ways:
This is how normal and beautiful people wear it. If you want to be normal and/or beautiful, wear it like this!
Alternatively, you can wear it this way:
This is how crazy people wear it casually. Don't ask me how they wear it on a bad day. Trust me, you don't want to know.
Ah, so you want the pattern now, do you? WELL YOU KNOW WHAT, I WON'T GIVE IT TO YOU
MUAHAHAHAHAH
Just kidding. Here you go!
Circle Scarf (AKA Infinity Scarf)
1 Ball of 100% Wool (pink) [I don't actually remember what the brand was as the label has been discarded for quite some time. But Facebook Garnitures Dressmaker Ltee., check out their photos and keep going till you see the photo of their yarns and it's the pink ball in the 6th row of the 2nd column) so yeah...not helpful
1 Ball Mohair to match (same instructions as above)
Correction (November 2012): The yarn is called Patons Wool Classic in blush pink and the thin yarn is Patons Lace in the Pink/brown/black blend. Use size 8 (5mm) knitting needles.
Instructions:
(Double up wool and mohair and knit with all four strands-->2 wool, 2 mohair. don't worry, it's not ridiculously thick)
1. Cast on 16 stitches (or 20. I found 16 made a nice width but that was also because I wasn't sure I had enough yarn. Turns out I didn't which is why the scarf turned into an infinity scarf).
2. Rows 1-4: Knit 2, Purl 2 across
3. Rows 5-8: Purl 2, Knit 2 across
4. Repeat steps 2-3 for desired length.
5. Cast off and weave in ends.
*NOTE: THESE ARE INSTRUCTIONS FOR A NORMAL SCARF
*If you decide to make an infinity scarf:
A) Make sure you leave a long tail at the beginning of piece (at least 20 inches. I'm not kidding)
B) Knit until piece measures (just let me go get my measuring tape)..we'll call it...45 inches from beginning
C) Cast off
D) Crochet short edges together (I suppose you can always sew them together, but I am deathly afraid of sewing so a crochet hook is the next best thing. Crocheting is actually always better than knitting but hey, another time.)
Correction (2012): having finally mastered the Mattress stitch, you're still going to need at least a foot of yarn when you bind off, so you can always sew the edges together if you're afraid of crocheting.
Enjoy!
Labels:
basketweave stitch,
circle scarf,
crazy,
crochet,
infinity scarf,
pink,
scarf,
soft,
wool
Thursday, October 20, 2011
Decontamination!
So yes... here I am. At my desk. 6 hours after writing the previous post about hats!
I love hats. I love making hats. Making hats is fun.
I sound like a weirdo now.
Alrighty then.
A few months ago I made myself that black fuzzy hat in the post titled "Hats!"
A fried of mine said "Oooooohh!...Make me a hat?"
And make her a hat I did. And then her sister asked for a hat. This was about 6 months ago.
I made the hat yesterday. Gaby 0, Procrastination 1.
And so began my little business as hat maker. Although it's less of a business and more of a give-hats-to-my-friends-who-ask-for-them-and-possibly-charge-them-for-the-yarn. But, as I previously said, I don't usually buy yarn to make hats. I use yarn that I've either stolen from my friends, my sister (who is a knitter, incidentally. I will forever claim that we are not related) and from my mother's ancient, (and I mean ANCIENT) stash of wool, which includes actual 30 year old handspun wool.
It didn't smell so good, to tell you the truth. Had a sort of...musty, wool-a-l'ancienne rather pungent scent. Then, I found teeny tiny worms in the wool and we had to decontaminate it with mothballs.
Yuck.
So I'm guessing you really didn't want to know that. And those of you in western civ potentially reading this are not paying any attention to your professor at the moment because you're desperately hoping for more tales about nasty bugsies.
Sorry to disappoint.
Anywhozzles, here's the other hat I promised I would post:
Same hat. Different models.
Ooooooh! Sneaky ;)
This is the hat I made for my friend's sister, who is also my friend but all this talk of friends is making me want to sink into the depths of facebook and never surface so I think I'll just get on to the pattern.
Very simple, very similar to my other hat.
Oh, and sorry for the horrible quality of the photos. I took them with my phone's camera and despite that fact that it takes great pictures for a cameraphone, the quality is still really really bad. Not to mention they both just went through photoshop for some slight light editing so that you can actually see what colors the hat it.
Alright. Moving on.
Materials: (oh, and I'm also playing around with the HTML instead of clicking "bold" because that's too easy XD) GO html course!
Worsted weight yarn (color A)
Sport weight yarn (if you want to follow the exact same pattern, the blue is slightly thinner than the cream)(color B)
Size 5 crochet hook (google what size that is in international sizing. I'm too lazy.)
Abbreviations (have you ever wondered why the word "Abbreviate" is so damn long? I haven't)
Sl st: slip stitch
dc: double crochet
sc: single crochet
ch: chain
trc: triple (or treble, if you will) crochet
Instructions:
1. Chain 6 with color A. Sl st into first ch to form a ring.
2. 12 dc into center of ring. Join with a sl st. (round 1)
3. 2 dc into each dc. Join with a sl st. (round 2)
4. 1 dc into first dc. *2 dc into next dc, 1 dc into next dc*. Repeat from *. Join with a sl st. (round 3)
5. 1 dc into first 2 dc. *2 dc into next dc, 1 dc into next 2 dc*. Repeat from *. Join with a sl st. (round 4)
6. 1 dc into first 3 dc. *2 dc into next dc, 1 dc into next 3 dc*. Repeat from *. Join with a sl st. (round 5)
7. By this point, if you're using the proper thickness of yarn, the top should be looking fairly big. If it still looks obsenely small, continue increasing (2 dc into 1, 1 dc into next 4 dc) etc...Don't do more than 6 increase rounds.
8. 1 dc into each dc. Repeat round until hat is 1 1/2 inches shorter than desired length (so keep trying it on).
9. When hat is 1 1/2 inches shorter than desired length, switch to color B.
10. With color B, 1 dc into each dc. (to get the spiky looking pattern, don't crochet into the little loops on top, chain into the space between double crochets.)
11. 1 sc into each dc (this time, chain into the two little loops of each dc).
12. Switch back to color A and 1 sc into each sc. Tie off, and thread yarn through inside of hat.
And there you go! A beeaautiful hat that's actually warm and cozy enough for these crazy Montreal winters!
For the flower:
1. ch 6 in Color A, keeping a 6 inch tail. Join with a sl st to form ring.
2. 9 sc into ring.
3. Switch to color B.* Ch 3, 3 trc into first sc, sl st into next sc*. Repeat for remaining sc. You should have about 7 or 8 petals.
4. Thread tail from color A through hat, tying flower securely onto hat (you can figure this out. If not, ask your sister or mom to do it).
So, there you have it. This hat took me about 2 hours to make, but once you get the hang of it, you can whip one up in no time.
Now, I have to go finish my best friend's birthday present. Let's just hope the final product is WOW worthy.
Ta!
Subscribe to:
Posts (Atom)